Source(google.com.pk)
My name is Sarah Waite, and I am the editor and creator of Chalkboard Nails. I'm just a gal who loves doing her nails! I appreciate all styles of nail art, from wild to refined, and enjoy keeping up with the latest trends in nails. I've always been interested in the creative arts, earning my BFA in Photography in 2010.
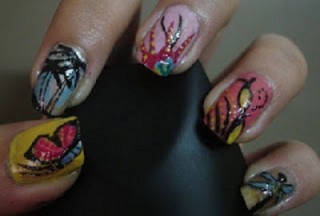
As I started planning out the manicure I wanted to wear for Cosmoprof, I knew I wanted it to be three things: freehand, unique, and done in gel. I thought back to the bee manicure that I did in September 2013, and remembered how much I enjoyed wearing it. I chose to go with a similar theme, but tried to bump up the difficulty a bit.
For my thumb, I used Lexi Martone's glitter gel technique to create a sparkly black nail. I started with a black gel base and then applied a mix of black craft glitter and Wet N Wild Fantasy Makers holographic glitter. The black glitter didn't show up very well, but it did help to space out the holographic glitter more evenly. Then, I used nail glue to attach a bee charm from Hex Nail Jewelry and sealed it in with gel topcoat.
The honeycomb pattern, bee silhouettes, tribal-inspired pattern, and honey drips were all painted freehand. I was really pleased with the level of detail I was able to achieve in the gel, and it lasted the entire time I was at Cosmoprof! The nails definitely got a lot of attention!
As this was my first time doing gel nail art, I was unsure how it would go. I remembered that the talented ladies at Hey Nice Nails use Presto Gels for their gel art and gave the brand a try myself. I used the black and white art gels as well as Presto Gel in Gradevole for the yellow base color.
Though I don't have much to compare it to, my experience with Presto was great. One thing to note, if you are ordering, is that many of the shades come in gel pots. If you are only used to the regular polish bottles that many at-home gel systems use, getting pots delivered can be kind of jarring. Regardless, it worked out great for me and I'm sure I'll be ordering more in the near future.
Bee-lieve it or not, I was even able to get the same amount of detail on my other hand! I think the mani-gods must have been smiling down on me that day.
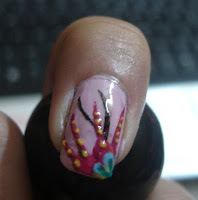
I semi-recently did a more graphic floral pattern, so I wanted to deviate from that and do something a little different. I was looking at some flowers trying to get inspired, and I saw a picture of the Stargazer Lily. It was so pretty and vibrant; I immediately wanted to use it as my inspiration.
Here's a step by step with how I did it.
Paint your nail white. Put on your favorite fast dry topcoat and let it dry
Then tape off very pointy triangles on each nail. Take a makeup sponge, and sponge on your base pink color, concentrating the color at the middle of the nail and having it fade outward. This will take a few spongings to achieve the desired effect. Peel off the tape slowly and carefully.
Then, with a nail art brush, small dotting tool, rubber end of a bobby pin, or toothpick (in order of desirability), apply the dark pink dots.
Then finally, paint on faint triangles of a glittery green color for the ribs of the flower. I used Wet N Wild - Ocean Grotto. Let dry for a bit, and top with topcoat!
Freehand Nail Art Nail Art Designs 2014 Ideas Images Tutorial Step By Step Flowers Pics Photos Wallpapers

Freehand Nail Art Nail Art Designs 2014 Ideas Images Tutorial Step By Step Flowers Pics Photos Wallpapers

Freehand Nail Art Nail Art Designs 2014 Ideas Images Tutorial Step By Step Flowers Pics Photos Wallpapers

Freehand Nail Art Nail Art Designs 2014 Ideas Images Tutorial Step By Step Flowers Pics Photos Wallpapers

Freehand Nail Art Nail Art Designs 2014 Ideas Images Tutorial Step By Step Flowers Pics Photos Wallpapers

Freehand Nail Art Nail Art Designs 2014 Ideas Images Tutorial Step By Step Flowers Pics Photos Wallpapers
Freehand Nail Art Nail Art Designs 2014 Ideas Images Tutorial Step By Step Flowers Pics Photos Wallpapers
.JPG)
Freehand Nail Art Nail Art Designs 2014 Ideas Images Tutorial Step By Step Flowers Pics Photos Wallpapers

Freehand Nail Art Nail Art Designs 2014 Ideas Images Tutorial Step By Step Flowers Pics Photos Wallpapers

Freehand Nail Art Nail Art Designs 2014 Ideas Images Tutorial Step By Step Flowers Pics Photos Wallpapers
Freehand Nail Art Nail Art Designs 2014 Ideas Images Tutorial Step By Step Flowers Pics Photos Wallpapers

Freehand Nail Art Nail Art Designs 2014 Ideas Images Tutorial Step By Step Flowers Pics Photos Wallpapers

Freehand Nail Art Nail Art Designs 2014 Ideas Images Tutorial Step By Step Flowers Pics Photos Wallpapers
Freehand Nail Art Nail Art Designs 2014 Ideas Images Tutorial Step By Step Flowers Pics Photos Wallpapers

Freehand Nail Art Nail Art Designs 2014 Ideas Images Tutorial Step By Step Flowers Pics Photos Wallpapers
Thanks for the information. I really like the way you express complex topics in lucid way. It really helps me understand it much better way. nail art gel
ReplyDelete