Tuesday 30 December 2014

Cherry Nail Art Nail Art Designs 2014 Ideas Images Tutorial Step By Step Flowers Pics Photos Wallpapers

Cherry Nail Art Biography

Source(Google.com.pk)

While there are number of colors to chose from as far as nail paints are concerned, ask any woman what is the best color for her nails or the one that she longs to have the most and she will tell you it is red. The appeal of the color red is universal. It was the original color in which nail polish used to come and there is a reason for that; the color red is universally seductive and the opposite sex is naturally attracted to this color. You may not be aware of this, but when a woman paints her nails red, she naturally becomes more confident and her gestures naturally more feminine. Such is the power of the color red.
If you thought that the only option while going for red painted nails is to paint them on simply, then that would be far from the truth. Now girls who love having their nails painted have started experimenting with nail art, then why should we not explore the possibilities of creating nail art using the color red?
We give here a few options for nail art that you can try using your favorite shade of red nail polish. These are just a few suggestions to get you going, you can experiment with variations that you find appealing:

Glitter French nail art: This is a simple way of painting your nails only on the tips in the way that is done after a French manicure and adding a lining of glitter to make it appealing and jazzy.

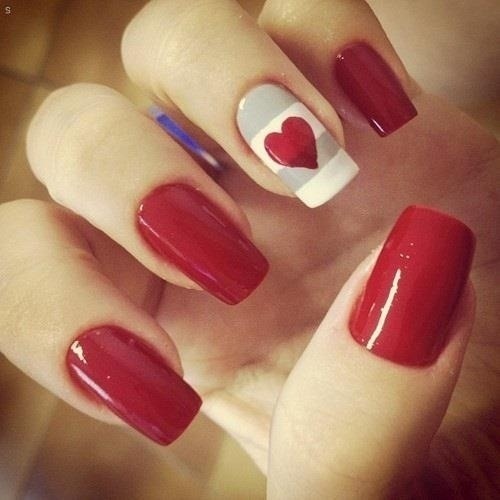
Red with black and silver: Red works well with black and if you throw in silver, you have a party going on right on your nails. You can start with a red base and then draw some patterns with black and edge these with silver nail polish.

Red ladybug nails: Ladybugs are cute beetles who serendipitously come in the color combination of red and black. There is black in the front part. Red in the body and a dividing line with black and then red dots to complete the look.

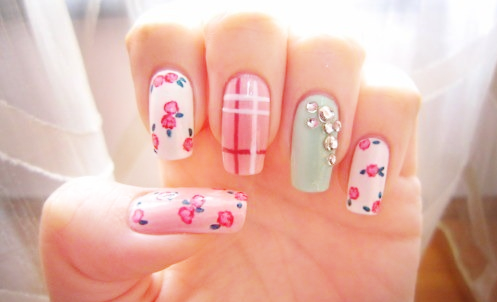
Red flower and crystal art: You can create floral art on the nails and stick a rhinestone in the center to make it look really pretty and dressy.

Red caviar for nails: These are actually shiny micro beads that come in different colors. After painting all your nails red, you can stick on red caviar on alternative nails to create a new and different look.

Red polka dots: You can simply paint your nails in a lighter hue and use a dotting tool to create cute polka dots in red all over the nail.

Red velvet: Paint the nails red simply and give it a velvet finish for the extra special look

Red paisley: You can work with red nails to draw paisley flowers for that quaint and innocent quality. If you are pairing this with a dress of the same print the overall effect will be really good.

Red leopard print: Creating leopard print effect on the red painted nails is yet another look that will make your nails look special.

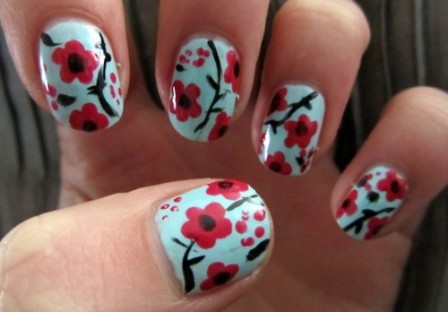
Red cherry blossom with Chinese symbol: The Chinese revere the color red and cherry blossoms and combining these along with a Chinese symbol will create an oriental look for your nails.

Red and yellow roses: Instead of going all red, you can combine a pattern that has both red and yellow flowers for a great and cool look on your nails.


Red snake skin: Snake skin pattern is another option that will look very striking and seductive at the same time.

Cherry Nail Art Nail Art Designs 2014 Ideas Images Tutorial Step By Step Flowers Pics Photos Wallpapers


Nails Art Nail Art Designs 2014 Ideas Images Tutorial Step By Step Flowers Pics Photos Wallpapers

Nails Art Biography

Source(Google.com.pk)
1. Line your nails with petroleum jelly or white craft glue before painting them for an easy cleanup.
2.If you're working on a nail look that's messy, use a cotton swab to rub petroleum jelly like Vaseline on the    around your nails first. This creates a barrier between the polish and your skin so that after you've painted      your nails, you can wipe off the Vaseline and any polish mistakes along with it.
3.Another way to prevent paint from drying on the skin around your nails is to paint around your nail with          Elmer's Glue first, and let it dry. Then, paint your nails with polish and peel off the glue when you're finished    to clean up.
4.To prevent the tips of your painted nails from chipping, paint two basecoat layers: one on the top half of        your nail and the second coat over the entire nail.
5.Paint the first layer of your basecoat polish on the top half portion of your nails only. After your nails have      dried, paint a second coat of polish, but this time cover the entire nail as you normally would. This                  technique will help the polish on the tips of your nails — which are more prone to chipping — last longer.
6.Use a white nail polish as your basecoat to make your nail color pop.
7.Unless your polish is super opaque, the natural tint of your fingers will change the color of your polish. To      get the paint's true color, add a layer of white nail polish first, and then go over it with your colored
8.Paint your nail art designs on a plastic sandwich bag first, peel them off, and seal them on your nails with        nail art glue or a clear topcoat for easy application.
9.If painting designs on your dominant hand is too difficult, try painting them on a plastic sandwich bag first.      Paint a few thick coats of polish onto the plastic, and then add your design on top. After it dries, peel each   design off the plastic, and adhere them to your nail with nail art glue or a clear topcoat.
10.Use paper hole reinforcement stickers as a guide for painting a half-moon mani.
11.Place the paper hole reinforcement stickers along the base of your nail, and seal it into place with a bobby      pin or a nail art dotter tool. Paint your first coat on each nail along the stickers. Then one nail at a time,          paint a second coat of paint, let it dry for a minute, and carefully remove the sticker. Use this tutorial for        more tips on a half-moon mani.
12.Give your nails two-tone designs with tape.
13.After you've chosen two different polishes, paint one coat of the lighter polish on each nail, and seal it            with a clear topcoat. After it is completely dry, apply two strips of tape over the tips of your nails so that        they cross in the middle and create a point. Take the darker of the polishes, and paint a layer over the            entire nail and on top of the tape. Let it dry for a minute, and then grab both ends of the tape and slowly        peel them back at the same time for the finished look.
14.Use the tip of a pencil eyeliner to place tiny nail art accessories like rhinestones on your nails.
15.When your fingers or tweezers are too big to grab and place tiny jewels, use the tip of an eyeliner or lip         pencil instead. The end of a pencil is tacky enough to grip the jewel from above and won't get in the way      of your design.
16.Create a French manicure with ease by looping a rubber band around your fingertip.
17.Take a rubber band and tie it in the middle. Loop one end over your thumb to create tension on the band,      and align the other end over the top of your nail and just below the edge to create the French tip shape.        Use the edge of the rubber band as a guide, and paint the tip of your nail.
18.Mix loose pigments with clear polish to make a custom nail shade.
19.Pour a little bit of eyeshadow pigment into a spoon, and then add a little bit of clear polish to it. Mix it all        together with a cotton swab, grab a brush, and try out your new color.
20.Create a marbled effect by using drops of swirled nail polish and a cup of water.
21.Choose an accent finger and tape underneath and around your nail to protect your skin. Next, fill a small         paper cup with filtered, room-temperature water. Grab two different colors of paint and add drops of          each polish into the cup of water, alternating paints each time. Once you've added a few drops, grab an        open paper clip and swirl the layers together to create the design you want. Then, stick your finger into         the cup with your nail facing the paint layer. Holding your finger in the cup for a few seconds, use your             paper clip to gather the rest of the paint away from your finger. Pull your finger out of the water and             clean up the edges for the finished look.
22.Make your nail polish dry faster by soaking your nails in ice water after painting them.
23.Make your nail polish dry faster by soaking your nails in ice water after painting them.
24.Spray nonstick cooking spray on your nails to help the polish dry faster.
25.PAM nonstick cooking spray also works as a quick-dry spray. Hold the can a few inches away, and           spray your nails evenly. Wait a few minutes, and then wash the oily residue off your hands.
26.Fix a smudged nail by adjusting the polish with the tip of your tongue.
27.If you accidentally smudge almost-dry nails, try readjusting the paint with the tip of your tongue instead of       your finger. Your tongue is just soft enough to fix the paint without leaving any imprints. Only use this tip        only when necessary though, and try not to lick your nail polish too often.
28.Remove stubborn polish by soaking cotton pads in nail polish remover, wrapping them around your nails,       and securing them
29.One way to make glitter polish easy to remove is to paint Elmer's Glue on your nails as a basecoat. Let          the glue dry completely, and then paint over it with as many coats of glitter polish as you want. Whenever      you're ready to remove your polish, peel back the glue and the glitter will easily come off with it.
30.Roll your nail polish bottle instead of shaking it to avoid air bubbles.
31.Hold the bottle between your palms and rub your hands back and forth to stir the polish without creating bubbles.
32.Loosen a stubborn nail polish lid by soaking it in hot water.
33.Place the nail polish bottle upside down in a cup. Fill the glass with really hot water just high enough to cover the lid but not high enough to soak the bottle of paint (hot water can tamper with the consistency of the polish). Wait a few minutes, remove the nail polish bottle from the glass, and then open the loosened lid.
34.Unscrew a tight lid by wrapping a rubber band around the handle for better grip.
35.Wrap a large rubber band around the top of a nail polish bottle before trying to open it. The rubber will provide a better grip for twisting.
36.Spread petroleum jelly around the lip of the bottle before closing it to prevent the polish from drying shut.
37.With a cotton swab, wipe a small amount of petroleum jelly into the ridges on the top of the bottle. This will make it easier to open the next time and prevent it from sealing shut.
38.Store your nail polish upright in a box with painted stickers on top to indicate the colors.
39.To keep your polishes organized, paint a strip of polish on an adhesive file folder label, punch out a hole, and stick the paint sample on the top of the nail polish bottle. Repeat this for all of your polishes, set them in a box, and store them in a cool, dry place.

Nails Art Nail Art Designs 2014 Ideas Images Tutorial Step By Step Flowers Pics Photos Wallpapers


Nail Art Sets Nail Art Designs 2014 Ideas Images Tutorial Step By Step Flowers Pics Photos Wallpapers

Nail Art Sets Biography

Source(Google.com.pk)
The next time you pull that bottle of nail polish out of your medicine cabinet, think about how people have been engaging in that exact same ritual for 7,000 years now. That's right — the history of nail polish (or nail art, to be exact…read on and you'll see!) is a long one, and full of ups and downs, blingy accoutrements, Victorian chaste, Eureka moments, and dull spans of non-inspiration.

We've trekked back through history to better understand the dear practice of digit décor that has spanned civilizations and continents. Apparently, we're not the only ones who like getting our nails did! Presenting: The illustrious, illustrated history of nail art.
5000 BC — Although the exact origin of nail treatments is murky, many sources say it began in India as women dyed their fingertips with henna — a practice that continues to this day!
3000 BC — The Chinese formulated a complex lacquer of gum arabic, gelatin, beeswax, vegetable dyes, and egg whites. Crushed orchid and rose petals helped to produce shades from pink to red, but the solution had to be applied to the nail for hours, and sometimes even overnight, to produce a properly pigmented effect.
600 BC — Aristocrats during China’s Chou Dynasty preferred a showier gold or silver on their lengthy nails. Blinged-out and bejeweled nail guards protected their nails, which were symbolic of wealth and leisure.
0 - 1800 AD — For a long period during the Middle Ages, manicures were more or less considered a thing of the past. The Dark Ages, indeed! It was during the Renaissance that the old tradition of manicuring nails was finally taken up again by wealthy European women — although they made sure to avoid any pigment. There was one bright spot in this period, though. Oceans away, the 15th Century Incas invented "nail art" as we know it — decorating their nails with intricate pictures of eagles.
1800s - 1900s — Manicures were popular once again during the Victorian age with a simple treatment of a light tint of red oil, accompanied by a chamois cloth buffering. This minimalistic treatment was in part due to the Victorian ideals of transparent inner beauty, physical hygiene, and moral purity. Etiquette guides recommended just a tad of lemon juice or vinegar to brighten the nail tips while Flaubert's most famous novel (1856) described Emma Bovary's nails as "scrubbed cleaner than Dieppe ivory".
1920s — It was the irreverent flapper of the '20s who, decked out with new clothes and a new attitude, reinvigorated the nail scene with the old-school red as well as the moon manicure.
1930s — In 1932, the first bottle of Revlon's nailpolish hit shelves in colors never seen before — making fashionable nail options more accessible than ever before, adding some economical style during the Depression. Polish as we know it also came from this era due to a new way of thinking — to stop staining the nail and coat it with hard enamel instead. The revolutionary idea had come from a French makeup artist, Michelle Menard, who was inspired by automobile paint. The new polish was concocted by the Revson brothers and a chemist Charles Lachman.
1930s - 1950s — In 1934, the dentist Maxwell Lappe created the first set of fake nails for clients who bit their nails. In 1955, another dentist Frederick Slack, who after attempting to mend a broken nail with acrylic, accidentally invented what was called the acrylic sculpting-nail extension.
1960s — Youthful pastel nail shades were popular in the '60s. As stars like Farrah Fawcett and Goldie Hawn played up their eyes (and hair!), they left their nails more natural.
1970s — The practice of applying long fake nails became widespread. To match the demand for expert manicures, beauty salons opened at an even higher rate. In 1976, American Jeff Pink created one of the most well-known manicures for busy Hollywood starlets: The French Manicure.
1980s — There was a lack of inhibition in fashion in the '80s, and so too did nail polish colors skew…a kaleidoscope of nail varnishes were made available, from neon yellows to glowing fuchsias to shocking blues.
1990s — The minimalist '90s brought traditional colors like reds, nudes, and pinks back en vogue, though the grunge fans had their moment to shine, too; Look anywhere, and you could spot chipped, black nails filled in with Sharpie markers.
2000s — With cool textures, sheens, and nail embellishments resulting in designs from ornate to just plain futuristic, there has been an unprecedented level of interest in nail art as well as the nail industry. Nails have become part of the whole outfit, with adhesives providing a never-before-achieved level of intricacy to manicure designs. Innovation in nail technology also has continued with the 2007 invention of Minx stick-ons. Creative Nail Design's Shellac also came out in 2008 with the first gel polish, aka the 2-week manicure. The past decade, DIY nail art reigned supreme, with nail enthusiasts skipping the salons and trying out (and blogging) a myriad of different homemade designs and effects.
If there's one thing we love in this world, it's dessert-inspired nail polish. (Yes, it's a thing.) And, apparently, we're not alone: Nails Inc. and fashion house Preen by Thornton Bregazzi have joined forces to create a four-piece lacquer collection that pays homage to everyone's favorite summer treat: ice cream.
In keeping with the theme, the British brands have designed three hues (a periwinkle, a pale pink, and a soft coral) evocative of the frozen treat itself. As for the fourth polish, we'd equate it to rainbow sprinkles — it's a shimmery concoction composed of multicolored squares suitable for use both alone and as a topcoat.

Nail Art Sets Nail Art Designs 2014 Ideas Images Tutorial Step By Step Flowers Pics Photos Wallpapers


Nail Art Supplies UK Nail Art Designs 2014 Ideas Images Tutorial Step By Step Flowers Pics Photos Wallpapers

Nail Art Supplies UK Biography

Source(Google.com.pk)
Fantastic choice of nail art & nail accessories, gels and nail polish at great prices for all nail professionals or anyone who just loves beautiful nails from UK's leading nail specialist - At Your Fingertips.
From gels to polish, nail art to airbrushing, At Your Fingertips supply everything you'll need to have incredible looking nails. We offer a fast friendly service with low prices and a fantastic choice for all nail technicians and nail enthusiasts.
Please visit our website to see our latest special offers and further nail products available.  Below are some examples of products we sell:

Arm Rests and Towels
Dappen Dishes
Airbrushing Paints and Stencils
Brushes
Gel Lamps
IBD Just Gel Polishes
Orly Gel FX Polishes
Orly Polishes
Top and Base Coats
Manicure Bowls
Nails Tips – Airbrushed/Glitter/French/Natural and Clear/Coloured
Nail Art – Stickers, Water Decals, Beads, Studs and Pearls, Charms, Dried Flowers and Shells, Foils, Glitter and Rhinestones, Hearts, Flowers and Confetti, Nail Art Canes, Nail Wraps, Swarovski Rhinestones, Smart Nail Art Stencils, Striping Tape
Pumps
Wall Mountable Polish Racks/Table Top Polish Racks
Nail Files and Buffers
Nail Tools

Our Nail Courses in Gel, Acrylic, Fibreglass, Airbrushing, Sculpting, Maintenance and Nail Art provide everything you need; Products, Tools, Tuition, Practice, Support, Assessment and Certification. We’ll train you at home, fast, and give you a recognised qualification in Nail Technology.
Dream is a range of exquisite gels and acrylics beautifully designed by professionals for professionals.
All Dream products use the latest advances in nail cosmetics making them the most beautiful to use and produce professional results time after time.
Creating amazing looking nail extensions takes practice, and the Nail Trainer practice hand provides as much as you need. The Nail Trainer has transformed nail training world wide as it drastically reduces the time taken to learn as compared with using live models; you can work on the Nail Trainer whenever you want, for as long as you want. Its realistic, jointed fingers, soft fingertips and different sized removable nails means you can make all your mistakes in private and not on potential customers.
Essential Nails also provide a free business advice service called Aspire which helps over 2500 new graduates annually take their first steps into the world of professional nails, whether they be working from home, in a salon or starting their own business.

Nails International, based in Silverstone, Northants, are leading suppliers within the UK and worldwide nail industry. Distributing a range of nail products such as
Defianze gels
Rapid LED gels
Coloured &Soakable gels
Effex Soak Off gel Polish
Pre etched tips
Files / Buffers
UV / LED lamps
Tools/ Implements
Tips & Glue
Handcare
Display Items
Mundo Hygiene products
Magis Foil Wraps
& much much more.

Nail Art Supplies UK Nail Art Designs 2014 Ideas Images Tutorial Step By Step Flowers Pics Photos Wallpapers