Source(google.com.pk)
Statement-making nail art designs are today’s must-have fashion accessory and this look created by Bio Sculpture nail artist, Simone Gilbert of Urban Bliss Beauty, is a simple yet effective way to dress up your digits.
This stunning design is inspired by the patterns you find on turquoise gemstone jewellery and can be used on just one feature finger or, if you’re feeling more adventurous, all your nails!
Products used:
• Bio Sculpture Executive Base
• #120 Turquoise Teacup Bio Sculpture nail polish
• #169 The Rebel Bio Sculpture nail polish
• #2017 Licorice Bio Sculpture nail polish
• Glad wrap
• Mug filled with cold water
• Hairspray
• Bio Sculpture High Gloss Top Coat
• Bio Sculpture Acetone Free Nail Polish Remover
• Bio Sculpture Quick Dry Spray
Step 1
Apply a base coat of Executive Base and two coats of 120 Turquoise Teacup and allow to dry.
Step 2
Scrunch a piece of glad wrap up and apply a little #169 The Rebel nail polish to a section and blot on some paper to remove the excess. Very lightly dab the plastic wrap on your nail to create a marbling effect.
Step 3
Take your mug filled with water and place two drops of #2017 Licorice nail polish into the water. The nail polish will spread out and when it does, quickly spray the water with hairspray and watch as it forms an amazing pattern. Dip your finger into the mug to apply the black polish to your nails.
Clean up any polish on the skin using Bio Sculpture Acetone Free Nail Polish Remover.
Step 4
Apply High Gloss Top Coat to finish and a spray of Quick Dry, a fast drying polish spray.
Posted in All, Bio Sculpture Gel, Guest Blogger, How To, Nail Art, Nail Inspiration, Nail Polish | Tagged bio sculpture gel, Bio Sculpture nail art, How To, Nail Art, nail art how to, nail art trend, nail polish | Leave a comment
CELEBRATE THE WORLD CUP 2014 WITH BIO SCULPTURE
With World Cup fever now in full swing, it’s the perfect time to be inspired by the vibrant colours of this global competition held in Brazil
Get creative using the colours below and show support for your favourite team with some inspired Bio Sculpture nail art! Don’t forget to share your designs with us on the Bio Sculpture Facebook page and tag us in your Instagram posts @biosculptureaus.
Posted in All, Bio Sculpture Gel, Nail Art, Nail Inspiration | Tagged bio sculpture gel, Bio Sculpture nail art, biogel nail art, Colourful nails, Gel colours, gel nails, nail art trend, World Cup 2014, World Cup Nail Art | Leave a comment
GUEST BLOGGER: SIMONE GILBERT, URBAN BLISS BEAUTY, MELBOURNE
We invited the extremely talented, award winning nail artist Simone Gilbert to create one of her favourite nail art looks for winter.
Simone explains: “I love creating 3D nail art and one of the most popular accessories with my clients is studs. Incorporating them on a feature nail adds stunning depth, texture and an extra hint of glam! Here are my top tips for applying and securing studs, gems or crystals for a three dimensional finish.”
Bio Sculpture Products Used:
Vitamin Dose
Executive Base
Gold Dots
Gold Foil Nugget
Base Gel
Soft Gel
Hard Gel
UV Top Coat Gel
#167 Seductive Lights
Steps
1: Clean and prepare the nail for your gel application. Apply Vitamin Dose to hydrate and nourish the nail.
2: Apply Executive Base to the centre of the nail bed and, once dry, lightly buff to remove the polish shine using your Grey Sponge file, being careful not to completely remove the polish. This step will not interfere with gel adhesion and ensures maximum protection of the nail during the removal process. Most importantly, it makes the gel faster to remove.
3: Apply a layer of Base Gel and cure with Bio Sculpture’s LED lamp for 30 seconds.
4: Apply two coats of #167 Seductive Lights to all nails except the feature fingers and cure each layer.
5: Using a sheet of Bio Sculpture Gold Foil Nugget, tear pieces off and apply to the feature nail. Pat down using your finger and cure for 10 seconds.
6: Apply a building layer of Hard Gel, cure for 60 seconds and then wipe away the tacky residue. Buff if required to shape.
7: Apply a thin layer of Soft Gel and while still wet apply your Gold Dots (studs) and cure for 30 seconds.
8: Apply a very thin layer of UV Top Coat gel as your finishing layer to seal in the studs and cure for 60 seconds. Remove residue and apply Cuticle Oil to the nail.
Posted in All, Guest Blogger, How To, Nail Art | Tagged bio sculpture gel, Bio Sculpture nail art, biogel nail art, Colourful nails, gold silver studs, nail art trend, Smoke & Mirrors Collection, Stud nails | Leave a comment
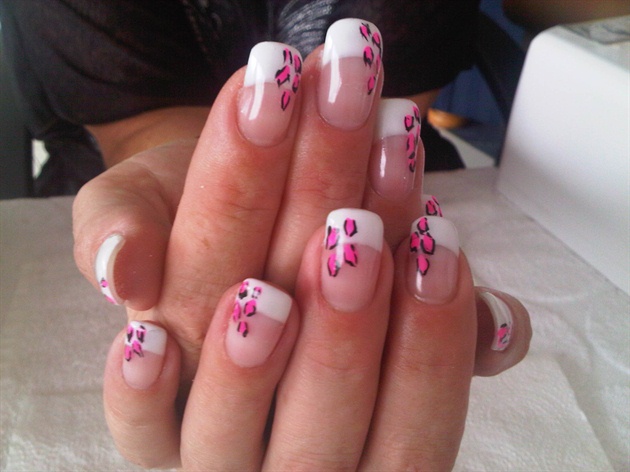
NAIL ART HOW TO: BUTTERFLY WINGS
To celebrate the launch of the stunning Smoke & Mirrors collection, we’ve created a beautiful butterfly nail art design using some of the new shades.
Here are the steps to create the look yourself!
Step 1 - Prepare nails for Bio Sculpture Gel application and apply Vitamin Dose to nourish and hydrate the nail. Apply two thin base layers of Bio Sculpture Clear Gel and cure. Refine with a Bio Sculpture Multi File grey sponge to remove any shine from the nail.
Step 2 - Using a Bio Sculpture Upper Arch Brush, carefully draw a rough outline of your butterfly using #2017 Liquorice and cure
Step 3 - Apply one layer of #168 Gilded Reflection to colour the inside of your butterfly and cure.
Step 4 - Create a gradation effect with #167 Seductive Lights, by lightly brushing along the edge of the butterfly wing, gradually building up the colour and then cure. Be sure to keep inside the butterfly wing outline.
Step 5 - Using a Bio Sculpture Art Brush, carefully draw a thicker final wing outline and any other black detail required using #2017 Liquorice and cure.
Step 6 - Using a Bio Sculpture dotting tool or Nail Art Brush, create dots along the black outline with #1 French White and cure.
Step 7 - Build an upper arch to ensure a smooth finish, using the correct treatment gel suited to the client’s nail type. Cure for 30 seconds.
Step 8 - Refine the nail with a Bio Sculpture Multi file sponge patch or Orange sponge file to create a smooth finish. Then apply with Bio Sculpture Gloss Gel (UV Top Coat) and cure for 30 seconds.
For more information and to find your nearest salon please call 1300 BIO GEL (1300 246 435) or visit www.biosculpture.com.au.
Posted in All, How To, Nail Art | Tagged Autumn/Winter Collection, bio sculpture gel, Bio Sculpture nail art, Colourful nails, Gel colours, gel nails, gold nails, Nail Art, nail art trend, New colours, Smoke & Mirrors Collection, Step-by-step | Leave a comment
GUEST BLOGGER: CHELSEA BAGAN, TROPHY WIFE NAIL ART
We invited Melbourne’s nail art queen, Chelsea Bagan, from Trophy Wife Nail Art to show us how to create a beautiful summer design using Bio Sculpture nail polishes.
Chelsea explains: “Summer and beautiful flowers go hand-in-hand, so I decided to create a simple and bright orange floral pattern using dots and dashes on the ring fingers.”
Bio Sculpture Products Used
Executive Base – the perfect strengthening nail base
Polish Colours – Tangerine #2028 and French White #1
High Gloss Top Coat – ideal to protect and give your nails a shiny finish
Dotting Tool
Striping Brush
Steps
1. Paint one coat of Executive Base
2. Paint two coats of French White #1 on the ring fingers and two coats of Tangerine #2028 polish on all the other fingers
2. With a Dotting Tool, draw six dots evenly spaced around the nail using Tangerine #2028
4. Using a Striping Brush, paint small dashes around each of the dots for your petals
5. Add any flecks around the edge of the nail to look as though it is a continual print
8. Finish with High Gloss Top Coat
Posted in Bio Sculpture Gel, Colours, Guest Blogger, How To, Nail Art, Nail Inspiration, Nail Polish | Tagged bio sculpture gel, Bio Sculpture nail art, biogel nail art, Colourful nails, floral nails, flower nail art, Nail Art, nail polish, orange nails, Trophy Wife | 1 Comment
PARTY NAILS TO MAKE YOUR LOOK POP
With the summer party season in full swing women across the nation are using fingers and toes dressed up with 3D textures, glitter and shimmer as a defining fashion feature to make party looks pops
Bio Sculpture Gel is the perfect option for a hassle-free, glamorous party season as our overlays will provide you with glossy, chip-free nails that will last through every occasion.
With champagne and fireworks being staples for celebrating special occasions, Bio Sculpture Gel’s top party looks this season are inspired by the ultimate ways to have a good time.
Bubbles
3D dots of gel add texture to metallic nails in sophisticated champagne or silver shades. (Gels used: #136 Smothered minerals, Hard Gel/S-Gel)
Black Champagne
Gold glitter looks stunning against dark or black coloured nails and this look with concentrated glitter at the top, gradually getting sparser, perfectly mimics a delicious glass of champagne to get you in the mood to party! (Gels used: #2017 Licorice with Gold Glitter nail art)
Statement Fireworks
Feel that holiday spirit in your fingers with an explosive, glittering fireworks design using two contrasting colours and plenty of sparkle! (Gels used: #129 Prince gradated with #138 Melting Mercury, #2017 Licorice)
Whether you gravitate toward glitter, want to experiment with metallics, or prefer a hint of sparkle, your local Bio Sculpture Gel salon will be able to create a look that allows you to hold your champagne flute in style this season
Posted in Bio Sculpture Gel, Collection, Colours, Nail Art, Nail Inspiration, Nail Polish | Tagged 2013 nail art trend, best gel nails, bio sculpture gel, Bio Sculpture nail art, biogel nail art, christmas nails, Gel colours, gel nails, gold nails, holiday nails, metallic nails, Nail Art, nail art trend, party nails, Rock and Crystal collection | Leave a comment
GET YOUR NAILS INTO SHAPE!
POSTED ON OCTOBER 8, 2013
Healthy manicured nails are the perfect beauty accessory to flaunt at the beach, pool and parties, so with summer on its way there’s never been a better time to whip your nails into shape!
Along with booking a Bio Sculpture Gel overlay (of course!) to keep your nails protected from the elements, here are some of our top tips for perfect summer nails.
BUFF UP: Remove dead skin cells from hands and feet and polish your skin with an exfoliating product like our Apricot Kernel Scrub to provide the perfect base for your manicure and pedicure. If you suffer from cracked heels apply heel balm to nourish the affected area.
MASK IT: Feet and hands can benefit from a moisturising mask just as much as your face can. Try our Mint Mask and for a decadent warming effect, wrap hands or feet covered with your mask in a warm towel and leave for 10 minutes before rinsing.
PROTECT: Defend hands and feet from premature aging by the sun’s rays with a nourishing hand cream containing a UV filter which will leave them feeling hydrated and soft.
PREP WORK: Prepare nails by removing stubborn skin from the nail plate and around the cuticle area with a softening cream or oil like Bio Sculpture’s Cuticle Remover. Use weekly to maintain healthy cuticles.
FIRST BASE: Apply Executive Base to strengthen weak nails and protect from discolouration.
GET GLOSSY: Finish your mani or pedi with a protecting top coat containing a sun filter that will shield your polish or gel from UV light exposure.
For more tips, visit your local Bio Sculpture Gel technician or call 1300 BIO GEL.
Posted in Bio Sculpture Gel, Collection, Nail Art, Nail Inspiration, Nail Polish | Leave a comment
GET THE GREAT GATSBY LOOK WITH BIO SCULPTURE
The world has been captivated by Baz Luhrmann’s classic The Great Gatsby, which depicts the glamorous era in classic Luhrmann style. Set in 1922, the film is a kaleidoscope of decadent parties and devil may care attitudes and don’t even get us started on the fashion!
From the custom made Prada gowns to the faithfully recreated Tiffany and Co diamonds, the attention to detail is impeccable. For the women of this era, personal grooming was an essential part of life to show social standing, and this carried right through to nails.
Perfectly manicured at all times, these ladies appreciated the allure of the perfect nail.
CAREY MULLIGAN AS DAISY BUCHANAN
Daisy kept her look very simple and classic- a subtle French Manicure on mid length, slightly almond nails. This look is perfectly created with a simple clear coat of Bio Sculpture Gel or perhaps a single coat of #2 French Pink.
Carey however was able to get a little more into the Gatsby party spirit in her Vogue spread, featuring shimmering metallic silver. Get the look with #2015 Silver Shimmer, #138 Melting Mercury, #2001 Silky Satin or #93 Golden Silver.
ISLA FISHER AS MYRTLE WILSON
Myrtle Wilson was the livewire of Gatsby, eccentric and wanting to be a woman of higher standing, she craved the aristocratic life. Tantamount to this was her need to appear wealthy, hence her glamorous red nails, always impeccably manicured. Get this classic look with one of the myriad of perfect Bio Sculpture reds.
If that’s not enough, take a look at some Gatsby inspired manicures courtesy of Pinterest- think plenty of #2017 Licorice and #136 Smothered in Minerals!
Posted in All, Bio Sculpture Gel, Collection, Colours, Nail Art, Nail Inspiration, Nail Polish | Tagged 2013 nail art trend, bio sculpture gel, Bio Sculpture nail art, biogel nail art, gel nails, gold nails, great gatsby, great gatsby nails, Nail Art, nail art trend, red nails, Rock and Crystal collection | Leave a comment
GUEST BLOGGER: SO NAILICIOUS – ROCK AND CRYSTAL HOW TO
POSTED ON MAY 14, 2013
If you are anything like us, you are obsessed with So Nailicious. Creator Maria has a knack for creating the most incredible nail art and transforming humble polish into artwork for the hands. So endless is her inspiration for nails, she created the So Nailicious 30 Easy Nail Art Designs e-book which is available to purchase here.
We are thrilled that Maria is such a huge fan of Bio Sculpture polishes, especially the Rock and Crystal collection which she used in the below How To for her beautiful Art Noveau look. We can’t wait to see what she will create next! Make sure to go check her out at www.sonailicious.com.au.
Meet Maria from So Nailicious:
So Nailicious is a one stop destination to help you to make your nails look fabulous! Nail art, how to’s, nail polish reviews, nail and hand care product recommendations as well as expert tips and the latest nail trends.
Maria explains:
The popularity of nail art is growing right now. The main reason is that people are now looking for ways to make themselves happy without spending much. And, nail art is something that makes you happy while you’re doing it and even more satisfying once it’s finished. Not to mention all the compliments you can get on your creative manicure!
Mix’n’match manicures are big at the moment. The brighter the colours, the bolder the patterns – the better. Just like fashion at the moment, it’s all about freedom of expressing yourself. Studs, stripes, florals and crystals in any colour.
The Art Noveau look here includes two contrasting colours, two different techniques and different patterns on each nail, which makes it a perfect example of a mix’n’match manicure. You can re-create this look in much brighter shades (for instance, black & neon) and it would still look good! Enjoy!
Here at So Nailicious, we are big fans of Bio Sculpture. It’s rare to find a brand that ticks all the boxes – great formula, great brush, beautiful color palette and easy to work with. It’s particularly good for striping tape nail art because it dries fast and covers your nails evenly resulting in a perfectly smooth surface. Part of the the secret of these polishes perfect formula must be that they are created by nail professionals for nail professionals
HOW TO:
Paint 3 coats of Totally Topaz #140 on all nails and let it dry.
Using striping tape create the pattern on each nail and paint over with Amethyst Moonstone #139. Remove striping tape.
Apply studs and seal your nail art with a generous layer or three of top coat.
Posted in Bio Sculpture Gel, Collection, Colours, Guest Blogger, How To, Nail Art, Nail Inspiration, Nail Polish | Tagged 2013 nail art trend, bio sculpture gel, biogel nail art, Colourful nails, gel nails, Nail Art, nail art trend, Rock and Crystal collection, So Nailicious | Leave a comment
ROCK AND CRYSTAL- NAIL ART INSPIRATION
POSTED ON APRIL 26, 2013
The incredible Rock and Crystal collection is available now, and with so many colour combination possibilities, just where do you start with nail art creation?
Bio Sculpture have designed several exclusive nail art ideas using the gemstone inspired Autumn/Winter collection. The shades in Rock and Crystal are multi-dimensional and dripping with metallic shimmer, providing the perfect complement to one another.
Take a look at some nail-spiration, and see below for a couple of How To’s so you can recreate the look yourself.
STEP 1: Apply Clear Gel and two layers of Colour Gel that you’d like as the base colour. Cure.
STEP 2: Apply blobs of two different colours randomly over the nail using a dotting tool. Do not cure.
STEP 3: Drag and swirl the dotting tool through the un-cured gel ‘blobs’ to create a marbling effect. Cure.
STEP 4: Apply a finishing gel and cure.
STEP 1: Apply Clear gel and two layers of colour gel and cure, as usual.
STEP 2: Apply a thin layer of Sealer Gel where you wish to apply the studs.
STEP 3: Place the studs into position and cure
STEP 4: Apply a thicker layer of Sealer Gel over the entire nail, paying special attention to the studs and cure.
STEP 5: Apply a finishing gel and cure.
STEP 1: Apply Clear Gel and two layers of Colour Gel and cure, as usual.
STEP 2: Use the Upper Arch Brush (UAB) to draw thin lines across the nail, in as many colours as required, do not cure.
STEP 3: Using a clean UAB, drag the brush gently through the lines of colour in the direction desired, cure.
STEP 4: Apply a finishing gel and cure.
The Rock and Crystal colours work in perfectly with each other, so mix them up and try different colour combinations of the following:
Smothered with Minerals (No 136) - A versatile bronze that changes with the light, filled with glitter sediments for a high shine shimmer.
Embellished Onyx (No 137) – Combining the shine of rich black onyx with a gritty embellishment. It’s dark gothic glamour at its finest.
Melting Mercury (No 138) – This solid silver, mirror-like tone makes a strong statement, with a high shine reflection.
Amethyst Moonstone (No 139) – This finish is almost black at first look but surprises with an ultra deep purple undertone.
Totally Topaz (No 140) – A chic golden tone, the rich pigment takes an intense yellow topaz inspired colour.
Nail Art How To Nail Art Designs 2014 Ideas Images Tutorial Step By Step Flowers Pics Photos Wallpapers

Nail Art How To Nail Art Designs 2014 Ideas Images Tutorial Step By Step Flowers Pics Photos Wallpapers

Nail Art How To Nail Art Designs 2014 Ideas Images Tutorial Step By Step Flowers Pics Photos Wallpapers

Nail Art How To Nail Art Designs 2014 Ideas Images Tutorial Step By Step Flowers Pics Photos Wallpapers

Nail Art How To Nail Art Designs 2014 Ideas Images Tutorial Step By Step Flowers Pics Photos Wallpapers

Nail Art How To Nail Art Designs 2014 Ideas Images Tutorial Step By Step Flowers Pics Photos Wallpapers

Nail Art How To Nail Art Designs 2014 Ideas Images Tutorial Step By Step Flowers Pics Photos Wallpapers

Nail Art How To Nail Art Designs 2014 Ideas Images Tutorial Step By Step Flowers Pics Photos Wallpapers

Nail Art How To Nail Art Designs 2014 Ideas Images Tutorial Step By Step Flowers Pics Photos Wallpapers

Nail Art How To Nail Art Designs 2014 Ideas Images Tutorial Step By Step Flowers Pics Photos Wallpapers

Nail Art How To Nail Art Designs 2014 Ideas Images Tutorial Step By Step Flowers Pics Photos Wallpapers

Nail Art How To Nail Art Designs 2014 Ideas Images Tutorial Step By Step Flowers Pics Photos Wallpapers

Nail Art How To Nail Art Designs 2014 Ideas Images Tutorial Step By Step Flowers Pics Photos Wallpapers
Nail Art How To Nail Art Designs 2014 Ideas Images Tutorial Step By Step Flowers Pics Photos Wallpapers
Nail Art How To Nail Art Designs 2014 Ideas Images Tutorial Step By Step Flowers Pics Photos Wallpapers
This is a really nice blog, I liked it very much,
ReplyDeleteThanks for sharing it here. There are lot many things you can do with your nails to decorate them with the easy you can check here those things
I appreciate everything you have added to my knowledge base.Admiring the time and effort you put into your blog and detailed information you offer.Thanks. best gel nail polish
ReplyDelete“Nice Post. It’s really a very good article. I noticed all your important points. Thanks" san diego department of health and human services
ReplyDeleteI think so. I think your article will give those people a good reminding. And they will express thanks to you later the men's health big book of exercises
Thanks for the nice blog. It was very useful for me. Keep sharing such ideas in the future as well. This was actually what I was looking for and I am glad to came here! Thanks for sharing the such information with us baptist school of health professions san antonio tx
I admire what you have done here. I love the part where you say you are doing this to give back but I would assume by all the comments that is working for you as well. Do you have any more info on this? how to solve the cost crisis in health care
ReplyDelete