Source(google.com.pk)
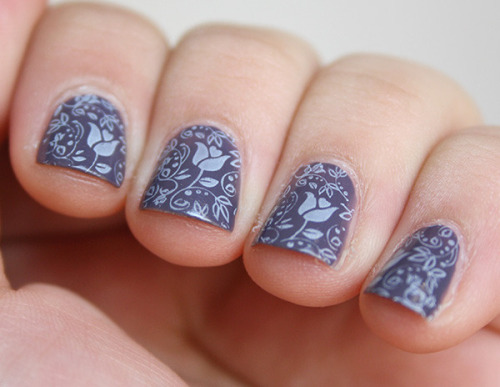
I applied this gorgeous creamy purple polish from Bio Seaweed Gel (BSG) called Star Struck to my nails to take a swatch picture, and I didn’t want to take it off! Star Struck is a very unique shade of dark purple that sometimes appears to be more of a blurple (blue-ish purple). I thought it would work great as a backdrop for a colorful design, and this is what I ended up with.
Floral stamped nails by Chickettes.com - Bio Seaweed Gel Star Struck Stamped with Mundo de Unas and WistoniaI added this floral design over top of BSG UNITY Star Struck using a floral pattern from the Wistonia Wedding Bliss stamping plate. This plate has some really adorable wedding-themed images, which you can see in the image below. If you’re getting married, or know someone that is, this plate would be great for creating some cute shower or wedding nails. I love the little “I DO!” bubble.
I applied the stamps with my XL squishy stamper and a pink stamping polish from Mundo de Unas. I also used the pink polish and a dotting tool to create the dots on my index finger and pinky. I wanted to make the leaves on the floral image green, so I used a small nail art brush and a green Mundo de Unas polish and traced over the stamp. The green might be a little too bright, but it works.
Wistonia Wedding Bliss Stamping PlateAnd here’s the swatch picture that I took of BSG UNITY Star Struck. Isn’t the color lush? I did a full wear test and review on a different Bio Seaweed Gel polish last week.
My friend Janie sent me a few new gel polishes from my wishlist for helping her out on a project. Thanks, girlie!! This is Ink Denim, and the name kind of says it all. It’s a shimmery dark blue that resembles a shade of denim. I’ve been wearing this for a couple of days now and have received several compliments on it. I’m really loving the Ink brand and can’t wait to try more of their colors. I still have a couple more untried ones on my shelf.
Ink Denim Swatch
Ink Denim Swatch
Today I remembered that I had some zipper water decals and thought what better to pair with denim? :) I applied a regular nail polish base over top of my gel manicure, painted on some colored triangles and applied my decals. I then topped everything off with Seche Vite. I’m sure the art won’t last long this way, but you know I’ll be ready to change up my mani soon again anyway!
This is my second (and probably last) Independence Day themed mani for the year. I went with a classic American flag stars and stripes look. I created this look with gel polish and stamping. This simple mani actually took several steps and a few layers of top coat. :) I find that I get the best results when I apply stamps and tape to a layer of top coat that’s been wiped clean of the tackiness, rather than trying to apply them directly onto the gel color. The steps that I took to achieve this mani are listed below. You can see my other 4th of July nail art here.
Chickettes.com - 4th of July / Independence Day American Flag Nail Art
Steps: (note that I cure after each coat of gel polish or TIO)
Normal prep & foundation layer application.
Applied a white base using two coats of Gelish Arctic Freeze.
Applied a very thin coat of Gelish TIO over the white, cured and wiped the tacky layer.
Used a piece of packing tape to block off half of the nail and I painted the exposed half blue using Gelish Mali-Blu Me Away (this has been my go-to color this summer!).
Pulled off the tape, and then applied another thin coat of TIO, wiped and cured.
Next I applied another piece of tape over the blue section of the nails, leaving the white exposed.
The red stripes were then stamped onto the white area using Cheeky plate CH10 and Mundo de Unas red stamping polish (#9).
Applied another thin layer of TIO, cured and wiped.
I applied another piece of tape, this time covering the red stripes.
The white stars were stamped onto the blue using Cheeky plate CH4 and Mundo de Unas white stamping polish.
And finally – a last layer of TIO was applied.
I know it sounds like my nails would be really thick with all of the layers, but I use VERY thin layers so they’re not that thick – but they are strong! :) When I go to remove this mani I will just be sure to use a nail file to break through all of the layers of TIO before soaking.
Nail Art Stamp Nail Art Designs 2014 Ideas Images Tutorial Step By Step Flowers Pics Photos Wallpapers

Nail Art Stamp Nail Art Designs 2014 Ideas Images Tutorial Step By Step Flowers Pics Photos Wallpapers
Nail Art Stamp Nail Art Designs 2014 Ideas Images Tutorial Step By Step Flowers Pics Photos Wallpapers

Nail Art Stamp Nail Art Designs 2014 Ideas Images Tutorial Step By Step Flowers Pics Photos Wallpapers

Nail Art Stamp Nail Art Designs 2014 Ideas Images Tutorial Step By Step Flowers Pics Photos Wallpapers

Nail Art Stamp Nail Art Designs 2014 Ideas Images Tutorial Step By Step Flowers Pics Photos Wallpapers

Nail Art Stamp Nail Art Designs 2014 Ideas Images Tutorial Step By Step Flowers Pics Photos Wallpapers

Nail Art Stamp Nail Art Designs 2014 Ideas Images Tutorial Step By Step Flowers Pics Photos Wallpapers

Nail Art Stamp Nail Art Designs 2014 Ideas Images Tutorial Step By Step Flowers Pics Photos Wallpapers
Nail Art Stamp Nail Art Designs 2014 Ideas Images Tutorial Step By Step Flowers Pics Photos Wallpapers

Nail Art Stamp Nail Art Designs 2014 Ideas Images Tutorial Step By Step Flowers Pics Photos Wallpapers
Nail Art Stamp Nail Art Designs 2014 Ideas Images Tutorial Step By Step Flowers Pics Photos Wallpapers

Nail Art Stamp Nail Art Designs 2014 Ideas Images Tutorial Step By Step Flowers Pics Photos Wallpapers

Nail Art Stamp Nail Art Designs 2014 Ideas Images Tutorial Step By Step Flowers Pics Photos Wallpapers
Nail Art Stamp Nail Art Designs 2014 Ideas Images Tutorial Step By Step Flowers Pics Photos Wallpapers
No comments:
Post a Comment